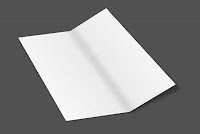
Hello, again. I surfed the Net searching for empty mock-up easy and ready to use in order to show a better presentation of my works. I found some resources in typography web sites but none of the were suitable for my intents. I decided to prepare what I need from myself and here I show all the steps I followed.
At the end of the article you can find the .psd file that you can use for your personal use. Shall we start then!
We are going to learn how to construct a folded 2 pages brochure mock-up with Photoshop.
First of all: why we need a mock-up?
A mock-up is useful for showing our works, for example, in our portfolio. Please, have a look at my personal portfolio to see this tutorial in action.
You can see here the final image.
Obviously we want our template scalable so that we can use it in more than one size without definition loss. So we have to do it with shapes.
1. Open a new document. I choose the size that I want for my final image so 650 x 450 px.
2. Select white as foreground color.
3. Select the rectangle tool and make a rectangle which is about the double weight size than the ideally folded brochure.
4. Press
Ctrl-T (Win). You can now free transform the shape by using the handles.
5. Keeping pressed Ctrl when you are on the handle you can move it and distort the shape. Give to the shape a little of perspective managing the four handles, as shown in the image.
6. To add the central fold select the
Add Anchor Point tool.
7. Add an anchor point in the middle of the top border and another to the bottom border.
8. Select the
Direct Selection Tool and move down the two anchor point that you have been created.
9. Select the
Convert Point Tool and make the two anchor point as angles.
Now we have a folded paper.
10. Select
Drop Shadow from the blending options and change parameters as shown below.
11. To add realism to the shadow we have to separate it from the shape and warp it a little. Right-click on the Drop Shadow effect and choose
Create Layer.
This action will detach the effect creating a new layer.
12. Press
Ctrl-T, right-click and then
Warp option.
13. Move the handles so that the shadow looks natural. Adjust the fill of the layers as preferred.
14. To add a little more realism we now apply a gradient to the shape. Change the parameters as shown.
Done!
Please
write me if have found this article interesting or you disagree with some techniques so that I can prepare more useful tutorials!
You can
download the .psd file for your personal use.
See you soon!


